Tutorial: Easy Pillow Case With Contrasting Hem
If you’re new here, welcome to Lazy Girl Designs blog. If you’d like to read about making your own purse, zipper tips, tutorials, and sewing resources on a regular basis, please consider subscribing to the RSS feed. Thanks for visiting!
Lazies, I have a quick and easy way to make a pillow case in a snap. I know, it’s already an easy project. How much easier could it get? Well, let’s see.
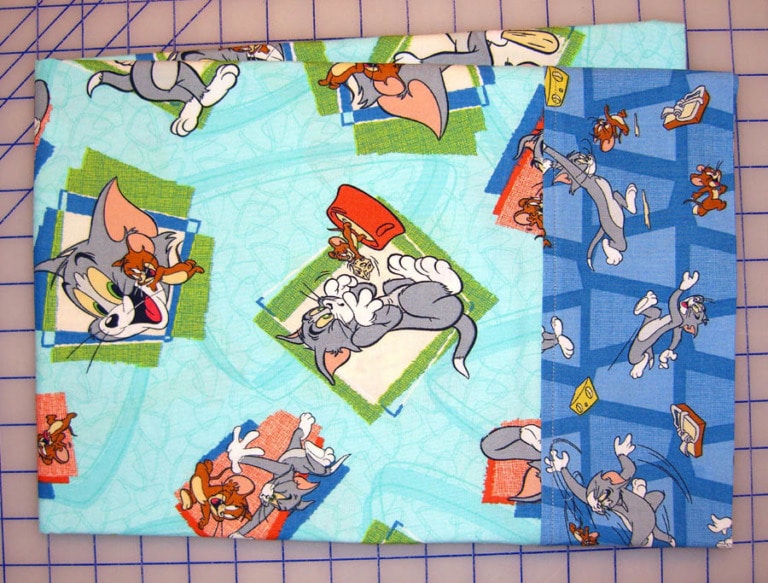
Here’s my finished pillow case. I made this for my nephew who loves the Tom and Jerry cartoon. Fabrics by Quilting Treasures. This project is great for cotton novelty and large scale prints.
I didn’t have a pattern, but I did have a plan. I used a standard pillow case as a guide for size.
The Lazy Part
I attached and finished the hem in one step. The hem is actually a tube turned right sides out. When sewing the tube, sew the body of the case into the seam at the same time. I showed this to some of my friends, thinking I was being clever, and they all said – yep, that’s how I do it. Some even add piping or other trim in the seam. Smart Girls.
Materials: I used 100% cotton, washed and pressed. Cut on the straight of grain.
Body of case – cut one at 26″ x 42″
Hem – cut one at 9″ x width of fabric, at least 43″
Note: I left the hem fabric wider than the body fabric.
Step 1
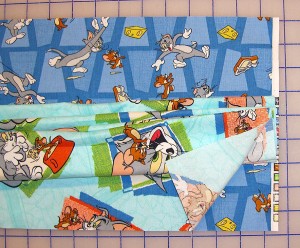
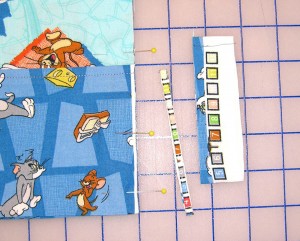
Lay hem fabric flat, with right side up.
Place body fabric on top, right side up, match long edge as shown toward bottom of photo.
Scrunch body fabric together into a pile as shown.
(Click any images to enlarge.)
Step 2
Wrap hem fabric over body fabric, match long edges and pin.
Use a one quarter inch seam allowance and stitch long edge.
Step 3
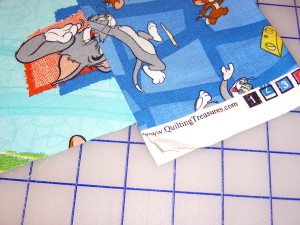
Turn hem fabric right sides out and press. Don’t worry, it’s easy to turn by hand.
The hem is finished on the inside and outside of the case and the body fabric is attached at the seam.
Topstitch along hem close to the seam at the body fabric.
Step 4
I started with the hem fabric wider than the body fabric so they could be trimmed to meet perfectly after sewn in place.
Finish with a French seam.
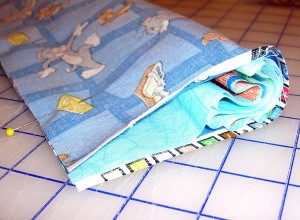
Fold the case wrong sides together, matching all edges.
Trim extra hem length to match body fabric.
Step 5
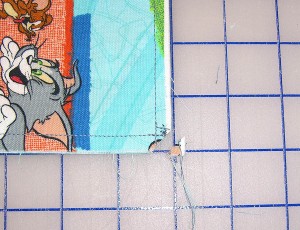
Use one quarter inch seam and stitch side and bottom edges.
Press and trim corner as shown. Trim seam allowances to approximately 1/8″.
Finish
Turn case wrong side out and stitch along side and bottom seam one more time to encase the seam allowance.
Note
Pressing at each step of the way is important for a nice clean finish. I pressed the seams to one side rather than pressing open like a traditional French seam.
I found a video demonstration on how to do a French seam on YouTube here.
This is a great serger project, too. Skip the French seam and finish right sides together with serged seams.
Enjoy!
Joan

Thank you for the pillowcase instructions. Video on French seams was a great help. I have had fabric for pillowcases and now your instructions will enable me to make these to give as gifts to grandchildren and nieces and nephews.
While you’re making a pillowcase for your loved ones, think about making an extra pillowcase for kids with cancer. Check out http://www.conkerrcancer.org/default.html. It’s a wonderful way for your guild to donate. I’ve been told that pillowcases for teenage boys are especially needed. The only instruction that is different from your beautiful illustrated one is: After the pillowcase is completed, wash it, dry it, iron it and then pop it into a quart size ziploc bag for donation. This step is needed for the protection of children with suppressed immunity.
Hope you are prepared for the pillowcase requests from family to come rolling in now – they are so fun and easy, and my eye is constantly drawn to novelty fabrics that are so great for these.
I have found a good soft economically priced fabric that I can get in neutral and white that I will often use for the body, and then put my novelty fabric in the cuff. This helps when the budget is tight. I have also used this with “band aid” fabric to make “get well soon” pillowcases, and I find the neutral body to be a bit more restful for someone who is not feeling well.
So many possibilities!!
These pillowcases are great quick gifts. I made my granddaughter one for every month of the year with appropriate themed fabric. She says they make her sleep better!! They make a wonderful, useful birthday gift for a child, something useful, made in birthday or whimsical fabric. I even made up a poem to go with the birthday p/c. They are also a good way to be doing my favorite thing (sewing) and helping someone else, when I make them for “Benjamin Smiles” or ConKerrCancer.
To quote Regina, “so many possibilities”.
Thank you Joan for bringing me back to the wonderful times I have had making and giving these pillowcases. I do like your LAZY way of doing the case – wonderful. And thank you Linda Dixon for the link to Conkerr Cancer and seeing all the wonder items that we can make to easy the time spent at the hospital for these children. This makes starting a new week even better! Thank you All! Kim 🙂
I have a really easy way to make pillowcases too………..you lay out the contrast band, then the body of the pillow case, then the accent band, roll it in a tube very easy. I made 5 yesterday afternoon…………………loves yours too
I have been making these pillow cases for several years, for my daughters 3rd grade class. She gives them as a Christmas gift from her. The kids love them and write me wonderful thank you notes, , Some of the parents tell me that the kids don’t want them to wash the cses, because they are afraid they won’t come back. It is a joy to do something that the kids love so well. It is a wonderful project for me because I can make the cases now and just put them up and they are ready for next Christmas. It is also helping in my downsizing project.
I love this idea. Especially good for novelty prints. Even for us big kids (like that Fireman and Construction worker fabric – lol). And Linda, thanks for that link.
Thanks for the link to the pillowcases for conkerrcancer.org. I can’t wait to get started. I have tons of fabric. I also have been busy making children’s quilts and looking for a worthy cause to donate them to. Any suggestions?
I make matching pillowcases when I quilt, then fold the quilt up and put in the pillowcase as the gift wrapping. Works great.
Thank you for the easy pillow case pattern. I have made numerous cool cases for my Grandchildren and even satin ones for an older Aunt who doesn’t like her hair messed up while sleeping. Your pattern is even easier then the one I have used. Another neat thing to do is make them for our soldiers overseas in sports patterns and also pretty ones for our gals in the service of our country.
where is the link to the fireman and construction worker fabric????? Sounds like a fun fabric!
what are the dimentions of a king size pillow case….
I am not especially talented but I do pillow cases and I think my method is the easiest ever. I use 3/4 of a yard of main fabric, 1/4 of a yard for cuff, and 9 inches for the zinger strip. The main fabric is laid ride side up, then the zinger strip which has been pressed wrong sides together and finally the cuff cuff which has also been pressed with wrong sides together. All layers are sewn together with a 1/4 inch seam. If you are fortunate enough to have a serger use this to do your seam all in one step. If you do not have a serger you can use an overlock stitch on your regular machine or the zig zag stitch after you have done the orinigal seam. After stitching press the cuff and zinger strip away from the main fabric. The only thing left to do is to stitch across the end and up the side.with right sides together. Again use the seaming method used previously. Turn right sides out and press.
How about doing a video. I am a bit confused. thanks
Oh this is great! I’ll be linking.
to
Lazy Talk Blog
especially to inava
Go to the website called http://www.linusproject.com
A great place to donate quilts or crocheted/knitted blankets!
Jeannie
I have been looking EVERYWHERE for ages for the directions for the tube method. I saw a video on line, downloaded driections, made several and lost the directions in a move. Anyone have those directions or link to online video??
These pillowcases are wonderful for loved ones in the hospital or nursing care homes.
I made several for my dad while he was sick . When nurses and doctors came in, the first comment was ” somebody is special and loved” the pillowcases made him special to them, just like he was to his family. Now each grandchild and great granchild now have a pillowcase to remember how special he was.
Make another pillowcase to give to some other special person. It will your heart smile.
We donate pillowcases to the local YMCA SOS Club. This is a homless shelter of sorts and it seves as a gift bag as well.
We call this pillowcas proceedure the “Buretto Roll”
The tube method is also called the burrito method. I can’t remember where I found it on the internet, but if you search (google, or what have you) with “burrito pillow case” you’ll find the instructions on a quilt guild’s news letter site.
I have made many dozens this way.
Thank you for this and also the christmas gift .I made that lovely Noriko bag up it is so lovely,now I am doing one for my daughter as she wants one as well and as she has not been well this will cheer her up,Thank you again.Anne
I LOVE your directions for making the pillowcases! The way I was taught I had to hand-stitch the hem to the body of the pillowcase to enclose the seam-yuck! Guess how many I made that way??!! Zero!! I can’t wait to try the “burrito” method. Thanks so much, Sheila
I volunteer at a group home for abused children. We always have to come up with craft projects for the kids. There are 18 boys and 18 girls all ranging in age from 8 – 18. There were a lot of them that wanted to learn how to sew. This is a perfect beginning project. They all now have their own pillowcase that they get to take with them when they leave the group home. They can have a feeling of accomplishment and it is THEIRS! Most of the kids end up there with nothing but the clothes on their backs. I pick out lots of different fun fabrics and they get to pick which ones they want. Sometimes there’s a fuss, but usually not. There are always new faces as the older kids go out on their own so it is a never ending supply of teaching and accomplishment.
Can’t see it real well-due to the busy pattern. Would still like to know how to do it. A beginner in sewing.
I made pillowcases for 4 of my grandkids and 1 great-grandson for Christmas. They loved them – even the teenagers. They watched a movie on Christmas afternoon and all of them were stretched out on the living room floor with their new pillows and pillowcases!
oh my gosh – this is a great tutorial. thank you! i’m getting ready to make a batch of tooth fairy pillowcases (with small pockets on the hem fabric!) and found this… thank you – this will allow me to crank out these in NO TIME!
Thank you for the wonderful tutorial! I can hardly wait to try it out… never would have thought to do it this way 🙂 Melissa
Pingback: Crafters Medley: 30 Neat-O Projects To Make (February) : TipNut.com
Pingback: Tutorial: Easy Pillow Case With Contrasting Hem « Quiltingcindy’s Weblog
I must be thick, because I could not make head or tail of these instructions.
Have read them through several times to no avail
While at Joann Etc. today, I found some oversized red ric-rac and fell head over heels for it. I love ric rac – reminds me of all the dresses my mom put on me in the 70s, I suppose. I figured it would take me weeks to decide what to do with it. Turns out, it only took a few hours. I remembered that my mom gave me a Wizard of Oz panel that I had no idea what to make into – not enough for a whole quilt, and too cute to cute up for a wall hanging. She also gave me a piece of coordinating Yellow Brick Road fabric. Long story short, I was putting my ric-rac in the sewing room, glanced over and saw the WofO panel on the shelf and it hit me: a Wizard of Oz pillowcase for my little girl!! I used the panel for the body, the yellow brick road fabric for the hem and the giant ric-rac to cover the seam between the two. Of course, I should also point out that I’d never made a pillowcase and had to google for instructions. Yours was the first one I found and I have to say thank you for the great tutorial! The photos were a big help. Thanks a million from this Kansas gal!
Pingback: Making Pillowcases | Creative Chics
what did the Lady mean when she said ,, first the cuff ,, and then the ZINGER? I assume its an extra band of embelleshment to go along with the cuff,, right ,, but Im wondering, because she didnt say ,, can the french hem be used with that?
Thank you for this tutorial. I was using a much tougher method to sew a bottom band on a pillowcase dress, and your instructions made my life so much easier! Thank you, thank you!
Pingback: Lazy Girl | Blog » Quick and Easy Last Minute Holiday Projects
I am making a bunch of these for the All People Quilt Million Pillowcase Challenge, I have found a local charity to make sure those in need receive them. So easy to make. I would have never thought of this method until I saw the pattern on the All People Quilt site. Thanks for sharing!
Pingback: Pillowcases for Mary Bridge Children’s Hospital + Pattern! | Tanya Peila - Just My Life
OMG – it’s been too long since I’ve sewn. Thank you for this WONDERFUL TUTORIAL on easy pillowcase with contrasting trim!! Now, I just need to figure out the size to cut for a 12 X 16 toddler’s pillow. I imagine I’ll find it shortly in your website! Blessings!
This is a great first sewing project for kids, love it!
Thank you